Upper mast section "only" with internal cable & a choice of 3 different finial nuts - does NOT include mast tube
|
1979L-1987 Delco Power Antenna
Mast and Cable, Installation Instructions
|
 |
|
These instructions are for the Delco power units that run on and don't stop when the power unit is turned on if the cable is broken that moves the mast. Early Gm Delco units did not have a mechanical stop in the gear case to shut off the power unit incase the cable that moves the mast broke. Also these instructions are for power units that do not allow the mast to be removed from the top of the storage tube. So if this is what you have these are the instructions on how to replace a cable in theses types of GM Delco power units.
These instructions are for after the power unit has been removed from the vehicle.
- Drill the heads of the rivets that are holding the case together and remove the rivets. Then remove the clips that are on the perimeter of the case.
-
Split the case and DO NOT remove the motor and brushes and remove the remaining cable and hook. Take a moment and remember how the hook is engaged to the drum so you know how to connect the new cable when the time comes.
-
Now take a Vise Grip and clamp it to the solid rod section of the mast and remove the tip that is screwed on that solid rod. Some rare versions, the tip will not screw off, if you have this situation the you will need to cut the tip off. The new cable will have the ability to have a new screw on tip to be installed so don't worry about cutting it off.
-
Now pull the remaining cable out of the bottom of the mast.
-
First this needs to be done.
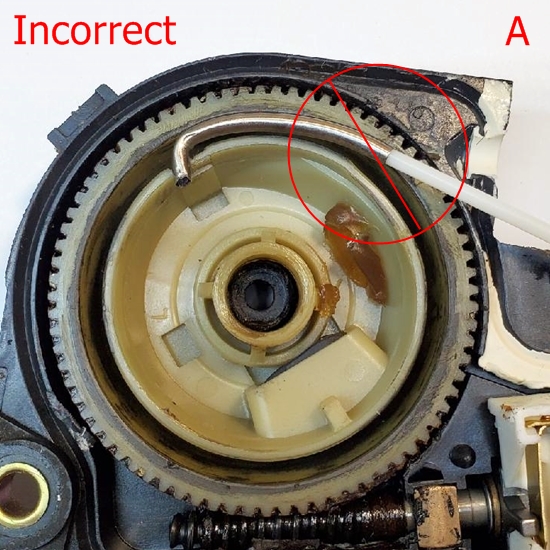
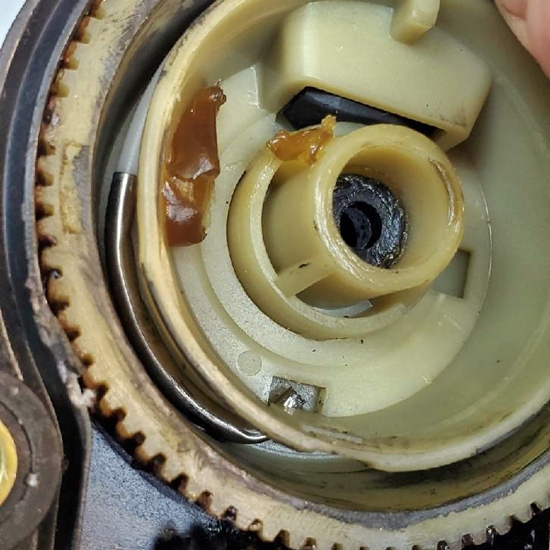
Note: Before you install the new cable you need to make sure the fish hook has the correct curve to it so that it lays into the drum centered, like photo B. If you do not do this it can break the cable at the fish hook when installing or lessen the life of the cable.
How to do this, dry fit the hook like what is shown in photo A, lay the hook on top of the drum and check the curvature of the hook, note that the fish hook is not going to lay into the center of the drum correctly.
Take 2 pliers and gently bend the fish hook so it ends up looking like photo B. Never touching the plastic cable as you do so. Doing this will extend the life of the cable. Do this before you install the cable into the drum.


This is how the hook should look like when installed. It needs to be centered in the drum and lay naturally between the drum walls.
Now How to Install the Mast and cable.
-
Now insert the new cable into the bottom of the mast and screw on the tip. Make sure that the cable move smoothly in the center of the mast as it extends. If it doesn't remove the cable and file around the connector that joins the plastic cable to the solid rod of that cable and take off any high points that may be on it from the crimping process of the cable to the rod from manufacturing the part. Then install it again and make sure it move smoothly.
-
Now with the mast extended in the storage tube, connect the hook into the storage drum. Position the drum with the fish hook engaged in the drum so the storage tube and cable will be able to put the case sections back together and be able to install the CLIPS. Make sure that the cable is positioned so that it will not be pinched by joining the cases together. All you need is the clips to keep the cases together. If you have a unit that has a bracket that holds the storage tube to the case then you will need to use some stainless screws at those connection points where there was a rivet. But the remaining removed rivets don't need to be replaced.
-
Now take the power unit to the car and with the key and radio off, plug in the power unit to the car and it should run down all the way, if so then turn the radio on and it should run all the way up, if it does so you are done other than installing it back into your vehicle.
|
|
|
This product fits the following Corvette model years:
1979 Corvette
1980 Corvette
1981 Corvette
|
1982 Corvette
1983 Corvette
1984 Corvette
|
1985 Corvette
1986 Corvette
1987 Corvette
|
Early, Late, or Mid
This product may not fit all Corvettes of the specifed year range. Some parts were changed midway through a Corvette model's production year. 'E', 'L', or 'M' in the year range designates that it fits "Early", "Late", or "Mid" year production Corvettes for the year specified.